Recall Alert - Kidde TruSense Smoke and Combination Smoke/Carbon Monoxide Alarm
TruSense Smoke and Combination Smoke/Carbon Monoxide Alarm Recall
Review the below Step-by-Step Guide to help determine if you have an affected alarm. If your unit is affected, please continue and register for a replacement.
Click here for Step-by-Step PDF Guide 
EASY REFERENCE GUIDE
| Model Number | Type | Image (Click for diagram) | TRUSENSE Imprint | AMBER = FAULT | Green Indicator Light * | Main Power Source |
|---|---|---|---|---|---|---|
| 2040-DSR | Smoke | Blink at 60 second intervals | Battery | |||
| 2050-DS10 | Smoke | Blink at 60 second intervals | Battery | |||
| 2060-ASR | Smoke | Continuous | Hardwired | |||
| 2070-VASCR | Smoke and Carbon Monoxide | Continuous | Hardwired | |||
| 2070-VDSCR | Smoke and Carbon Monoxide | Blink at 60 second intervals | Battery | |||
| 2070-VASR | Smoke | Continuous | Hardwired | |||
| 2070-VDSR | Smoke | Blink at 60 second intervals | Battery |
* Indicator light will show green in standby / normal mode
For detailed instructions, please refer to the “Step-by-Step Guide” below.
Recall Request Guide
TruSense Smoke & Combination Smoke/Carbon Monoxide Alarms
At Kidde, the safety of our customers is our top priority. We have identified a potential product safety issue related to TruSense Smoke and Combination Smoke/Carbon Monoxide alarms. As a result, and in conjunction with the United States Consumer Product Safety Commission (“CPSC”), we are voluntarily recalling these alarms.
Understanding that many smoke alarms may look similar, we developed this guide to assist in determining if your alarm is included in the recall. Below please find quick charts and simple step-by-step instructions to identify your alarms and the information you will need to process your replacement request.
AFFECTED ALARMS
Kidde TruSense Smoke and Combination Smoke/Carbon Monoxide alarms that were purchased between 2019 and 2020 are included in this recall. This includes seven models:| Model | Alarm Type | Main Power Source |
|---|---|---|
| 2040-DSR | Smoke | Battery |
| 2050-DS10 | Smoke | Battery |
| 2060-ASR | Smoke | Hardwired |
| 2070-VASR | Smoke | Hardwired |
| 2070-VASCR | Smoke and Carbon Monoxide | Hardwired |
| 2070-VDSCR | Smoke and Carbon Monoxide | Battery |
| 2070-VDSR | Smoke | Battery |
The affected units were manufactured between May 15, 2019 and September 25, 2020 and sold primarily through The Home Depot, Walmart, Amazon and Menards.
STEP-BY-STEP GUIDE
Step 1: Identifying Affected Alarms
By following this simple guide, you will be able to easily determine if your alarm is impacted. Many of the models include unique features including:
- TRUSENSE logo etched into the cover
- "AMBER = FAULT" text next to the indicator light
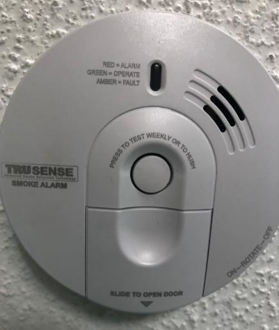
Step 1A: Look for the TRUSENSE LOGO
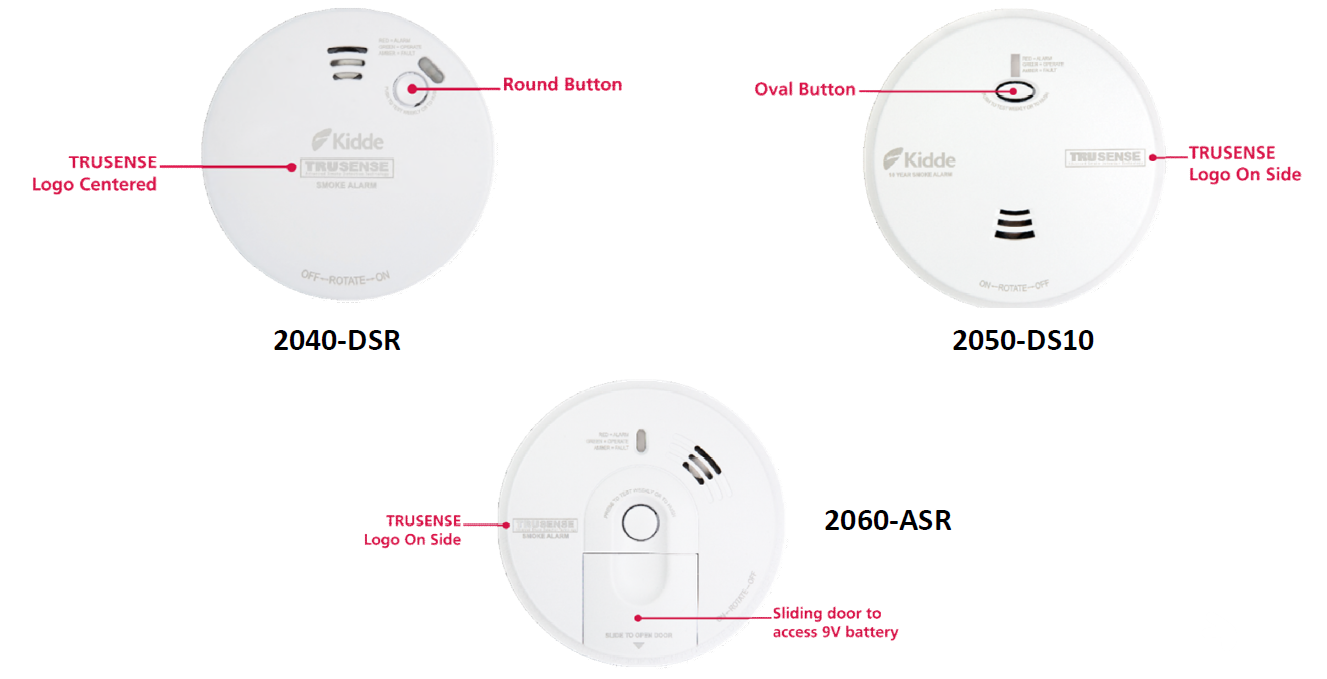
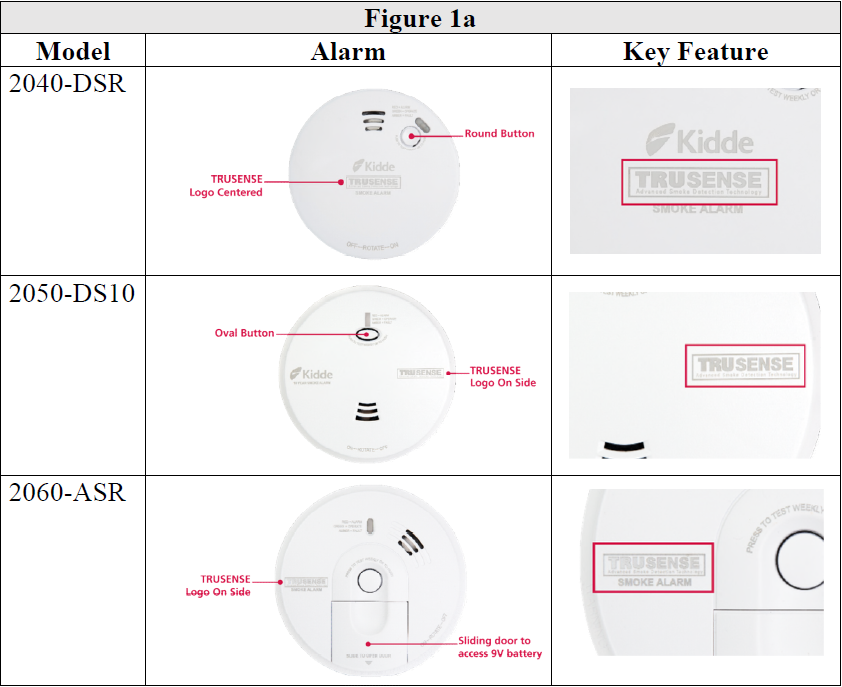
The first step to identifying affected models is determining the presence of a TRUSENSE logo. Models 2040-DSR, 2050-DS10, and 2060-ASR feature this imprint.
- Look at the alarm’s front cover (this faces the room, visible from the floor or room) to spot a gray or black "TRUSENSE" logo etched onto the cover - see image 1 for an example closeup view.
- The TRUSENSE logo will be easily visible when standing directly underneath or next to the alarm at its installed location on the ceiling or the wall.
- For a complete visual guide please refer to Figure 1a.
- TRUSENSE logo IS identified = the alarm is part of the recall.
- Note on purchase dates: This is applicable only to alarms purchased from May 2019 through September 2020. If you are unaware of the purchase date, the location of the TRUSENSE logo (as described in Figure 1A) can be used to determine if the alarm is part of the recall.
- Please write down the model number for each alarm and keep it handy.
- Jump to Step 2.
- TRUSENSE logo is NOT identified, please proceed to Step 1B
Outcome:
- TRUSENSE logo is IS identified = the alarm is part of the recall.
- Note on purchase dates: This is applicable only to alarms purchased from May 2019 through September 2020. If you are unaware of the purchase date, the location of the TRUSENSE logo (as described in Figure 1A) can be used to determine if the alarm is part of the recall.
- Please write down the model number for each alarm and keep it handy.
- Jump to Step 2.
- TRUSENSE logo is NOT identified, please proceed to Step 1B.
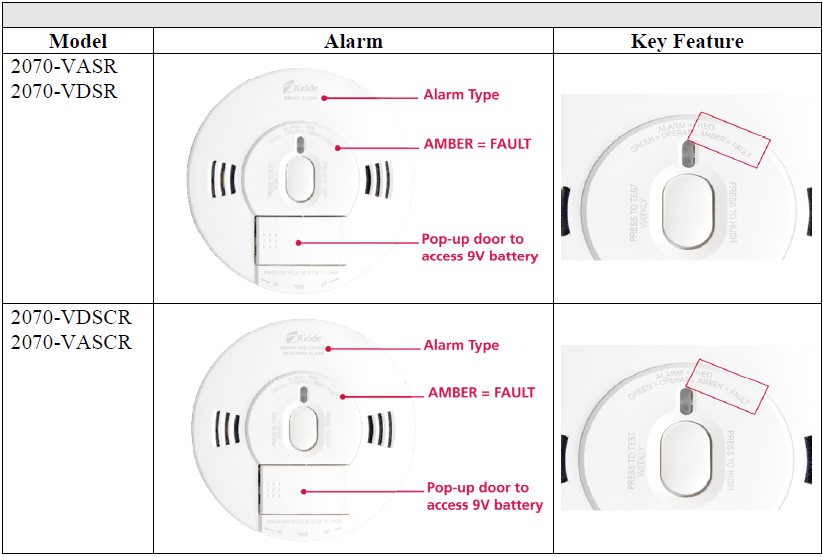
Step 1B: Look for "AMBER = FAULT"
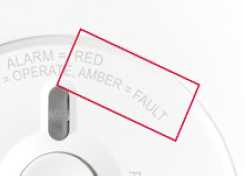
If the TRUSENSE logo is not present, please look for the TruSense alarm line unique feature of "AMBER = FAULT" printed next to the status light on the front cover.
Models 2070-VDSR, 2070-VASR, 2070-VDSCR, and 2070-VASCR feature this imprint and have a pop-up 9V battery access door that is also visible from the front cover.
- Look at the alarm’s front cover (this faces the room, visible from the floor or room) to spot the words "AMBER = FAULT" next to the indicator light.
- This should be easy to see by standing directly under or next to the alarm at its installed location on the ceiling or the wall.
- For a complete visual guide please refer to Figure 1B.
Outcome:
- If the "AMBER = FAULT" text is visible next to the indicator light, this model is included in the recall. Please proceed to Step 1C to determine the model number.
- If the "AMBER = FAULT" text is NOT visible, your alarm is not affected.
- If you are unsure or have questions, please contact the Kidde Support Center: toll-free at 1-844-796-9972 from 8:00 a.m. to 8:00 p.m. ET Monday through Friday and 9:00 a.m. to 3:00 p.m. ET on Saturday.
Step 1C: Identify the Model. (2070 Models only)
If the "AMBER = FAULT" text is present and the TRUSENSE logo is NOT, this is most likely a 2070 model alarm. Please follow the instructions in Figure 1C below to help identify the specific 2070 model.
- Identify the alarm type. This can be located on the alarm's front cover and should be "Smoke Alarm" or "Smoke and Carbon Monoxide Alarm" – see image 3 for an example closeup view.
- After determining type, look at the green LED Light (indicator light) to determine if it has a steady glow or blinks.
- With hardwired alarms (2070-VASR and 2070-VASCR), the indicator/green LED light has a steady glow
- With battery powered alarms (2070-VDSR and 2070-VDSCR), the indicator/green LED light will blink
- For a complete visual guide please refer to Figure 1C.


Outcome:
- Please write down the model number for each alarm and keep it handy. Please proceed to Step 2.
Step 2: Gathering Alarm Photos
During the request process, photos of each installed alarm will be necessary. We will ask for two (2) photos of each alarm in its installed location. Please not remove the alarm until you receive a replacement!Step 2A: Photo #1 - Alarm
- With the phone/camera, zoom in on the alarm to ensure the unique features listed in product identification section (illustrated in Figure 1 and Figure 2) are visible.
- Take a clear, well-lit picture ensuring that the text can be read. Capture a square portion of the alarm as per the below example. (example shown in Figure 2a).
Step 2B: Photo #2 - The Room
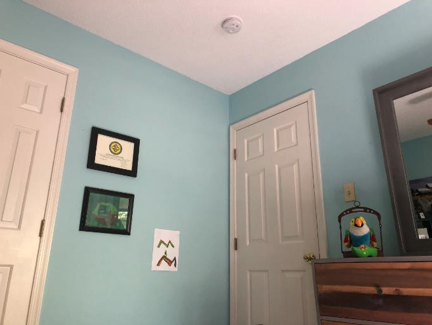
- Take a clear, well-lit picture.
- Be certain that the entire alarm is shown in the photograph with several feet on either side. Please see example in Figure 2b.
NOTE: If you purchased an affected alarm, but have not installed it, please take a picture of the packaging and receipt.
Step 3: Submitting Your Request
Now that you have properly identified and photographed the recalled alarms, you can submit your claim for a replacement.What you will need:
- Before beginning the process please ensure you have captured and documented the model numbers and photos for each of the affected alarms.
- A blank piece of white paper to create Claim Confirmation Sheet
- A pen or pencil
Step 3A: Starting Your Claim
Please visit Kidde’s Online Support Center at kiddetsalarmrecall.rsvpcomm.com or https://www.kidde.com/home-safety/en/us/support/product-alerts/ for detailed instructions on how to identify affected alarms, receive a replacement alarm free of charge, properly dispose of an affected alarm once the replacement is received, as well as other information.Alternatively, the Kidde Support Center may be reached toll-free at 1-844-796-9972 from 8:00 a.m. to 8:00 p.m. ET Monday through Friday and 9:00 a.m. to 3:00 p.m. ET on Saturday.
Step 3B: Selecting Products
Through the menu, please indicate your model.Once complete, press "save and continue"
Step 3C: Entering Shipping Address
On the next screen please enter the address you would like the replacement to be shipped. Note: We can only ship to physical street addresses.Hit "Continue"
Step 3D: Uploading Photos
For each alarm, upload 2 product photos by hitting "photo guide"Hit "Continue"
Step 3E: Create a Claim Confirmation Sheet
At the top of the form should now appear a "Claim Number" followed by a series of numbers and letters, i.e. Claim Number 16A.As part of the submission process, we ask you to create a Claim Confirmation Sheet to be uploaded as a final step. Please follow the below instructions:
- On a blank white sheet of paper, write your full name (first and last, i.e. John Smith) and Claim # (provided during the online product registration process)
Example:
Name: John Smith
Claim # : 000016A - Move all other objects out of the camera’s view so that the sheet of paper is the only item captured in the photo
- Take a clear, well-lit picture of the Claim Confirmation Sheet
If you have any questions, or are unable to collect the required photography, please call the recall hotline at 1-844-796-9972.
Step 4: Replace Alarm
Your alarm should arrive within 3 business days once the submission is completed in full. Please leave the affected alarm(s) in the installed location until the replacement alarm(s) arrives.
ADDRESS
Kidde
c/o RSVP Communications, Inc,
8765 W Market Street
Greensboro, NC 27409
CONTACT
Phone: (844) 796-9972
Monday-Friday 8am - 8pm EST
Saturday 9am - 3pm EST
Recent Posts
-
Fire Sprinkler Head Corrossion and Corrosion Resistant Finishes Explained
Corrosion resistant sprinklers are designed to resist exterior elements that attack a standard brass …Mar 7th 2024 -
Recall Alert - Kidde TruSense Smoke and Combination Smoke/Carbon Monoxide Alarm
TruSense Smoke and Combination Smoke/Carbon Monoxide Alarm Recall Sold from May 2019 through Septem …May 6th 2021 -

Recall Alert - Universal Security Instruments Smoke Alarms. Two Alarms Require Inspections
Universal Security Instruments in conjunction with the U.S. Consumer Product Safety Commission (CPS …Jul 22nd 2019